Tightly Integrating Git into Vim
Your preferred workflow will of course direct your choice of which tools to use, but what I find interesting is how the tools themselves may reversely influence the way you work. Most developers are quite familiar with the git CLI, and will have no desire for pulling git into their editor of choice. What I have found, though, is that having git at my fingertips while I edit code has changed the way I write code for the better.
In this article I will present some excellent git-related Vim plugins which makes version controlling your code a breeze, so much so that version controlling your code becomes productive in itself, even ignoring all the traditional benefits of using git.
airblade/vim-gitgutter
Effortlessly moving between regions of interest in source files is a really central part of maintaining flow while writing code, and many tools are available for this purpose in vim:
- Fuzzy searching all types of objects with fzf.vim.
- Using ctags in order to navigate to a specific construct.
- All types of movement operators such as
{/},t/T,f/F,<C-d>/C-u, and so on. - Setting and moving to destination markers with
`<mark>andm<mark>.
But I have always found marks a bit jarring to use in practice, as you have to set the marks before moving away and then having to remember those marks later. Marks do serve a really important purpose though, especially when you are jumping between two sections in the same file repeatedly. This is where the vim-gitgutter plugin comes to the rescue.

Screenshot taken from airblade/vim-gitgutter README.md.
Even though many install the plugin for aesthetic purposes, where the plugin actually really shines is the way it enables you to quickly jump between “modified git chunks” and to operate upon those chunks. It is this aspect of the plugin I want to focus on in this article, ending with some interesting observations about how this plugin permanently changed my development workflow for the better, and how it may do the same for you.
Start by installing the plug-in with your vim plug-in manager of choice. Here I’m using vim-plug:
Plug 'airblade/vim-gitgutter'You can modify the signs used in the sign column like so:
" Use fontawesome icons as signs
let g:gitgutter_sign_added = '+'
let g:gitgutter_sign_modified = '>'
let g:gitgutter_sign_removed = '-'
let g:gitgutter_sign_removed_first_line = '^'
let g:gitgutter_sign_modified_removed = '<'
If you are using a UTF-8 supporting terminal emulator and a patched font, then you can use more fancy icons if you wish. I use the kitty terminal emulator with a patched version of the DejaVu Sans Code font type from Nerd Fonts. The only difference is that the gutter signs are Font Awesome icons with thicker strokes and somewhat rounded corners. You can find my exact glyphs here if you wish to try it out yourself.
If you prefer a simpler look, I also recommend setting the background color of the sign column to your general background color:
let g:gitgutter_override_sign_column_highlight = 1
highlight SignColumn guibg=bg
highlight SignColumn ctermbg=bg
The final results with the gruvbox color scheme looks like this:
The different signs might be somewhat cryptic at first sight, but here are what they indicate (from top to bottom):
- Deletion of line(s) above.
- Deleted line(s).
- Modified line.
- Deleted and modified lines.
Changing vim’s option for updatetime from the default of 4000 to ~100 makes the gutter signs appear more responsive:
" Update sign column every quarter second
set updatetime=250
Play the video below too see the signs being updated during an edit-session:
Updating sign column with vim-gitgutter.
Now that the aesthetics are out of the way, let’s focus on navigating between chunks.
You can jump between modified chunks with the GitGutterNextHunk and GitGutterPrevHunk <Plug> bindings.
" Jump between hunks
nmap <Leader>gn <Plug>GitGutterNextHunk " git next
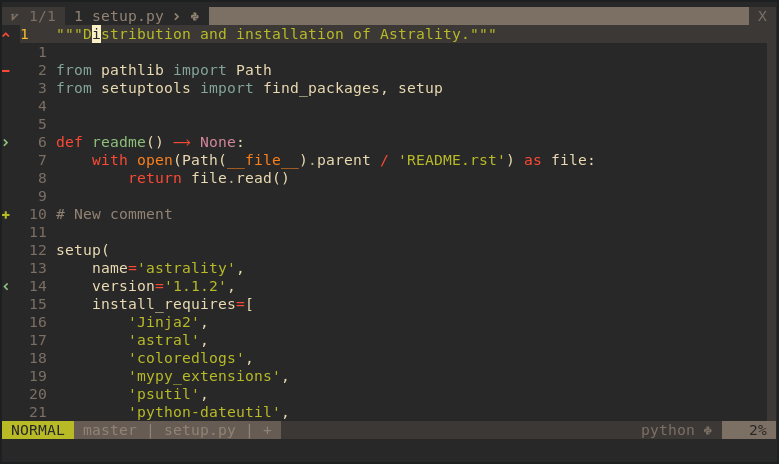
nmap <Leader>gp <Plug>GitGutterPrevHunk " git previousNow when you start editing your source code, you will quickly realize that most editing sessions are restricted to just a few sub-sections of your source code, most of which you will jump between frequently. Without putting any effort into it, you end up placing implicit markers all over your source code in the form of git diffs. Using our previously set key-bindings, we can easily jump between these modified chunks:
Navigating between chunks with vim-gitgutter.
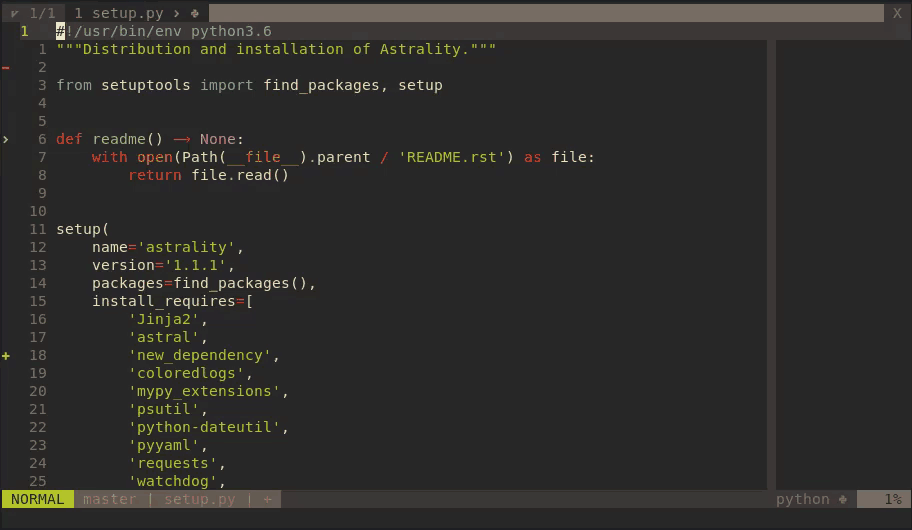
You can also add a binding for staging individual chunks with GitGutterStageHunk and reverting a modified chunk back to git HEAD with GitGutterUndoHunk:
" Hunk-add and hunk-revert for chunk staging
nmap <Leader>ga <Plug>GitGutterStageHunk  " git add (chunk)
nmap <Leader>gu <Plug>GitGutterUndoHunk   " git undo (chunk)
I recommend setting these key-bindings to something can be easily succeeded by the key-bindings we made earlier. That way you can jump from chunk to chunk, undoing and staging chunks as needed. We have now completely replaced the need for git’s (cumbersome?) interactive staging functionality, all without leaving our editor at any point in time.
Undoing and staging chunks with vim-gitgutter.
What I find really interesting is how this plugin has changed my workflow for the better. Some changes I have seen are:
- Almost all of my commits are now partial commits. My git history ends up being much more atomic, each commit having a clear, singular purpose.
- I keep track of remaining work by navigating over remaining code chunks. If I consider a chunk to be completed, I stage it and forget about it. This allows me to easily ignore finished code.
- Staging occurs when my cursor is placed on top of the code to be staged.
That way I know exactly what code goes into the staging area, implicitly enforcing a last-time quality check of the code.
No more
git add -aor similar blunders which result in bad code being pushed to a remote repository. - All my written content must now be version controlled since this plugin has become such a crucial part of my mental model of editing text. My work is therefore mostly backed up to GitHub, while giving me the necessary tools to revert changes, and so on.
- It is much easier to do “non-linear” experimentation. What I mean with this is that it enables you to safely edit some code at location A, then make some permanent changes over at B, and finally completely reverse the first change at A without altering location B. This detaches your changes from the concept of time and rather associates it with source code location instead, which I think is much more useful as a mental model for source code changes.
jreybert/vimagit
Now, vim-gitgutter works really well for one source file at a time, but project-wide git management is still something we need to handle within Vim. Jreybert’s awesome vimagit plugin offers most of the remaining git CLI-equivalent functionality The somewhat young plugin, relative to Vim’s age that is, was inspired by the excellent Magit plugin for Emacs and is already quite feature complete. We start by installing it:
Plug 'jreybert/vimagit'Magit allows you to open a separate git buffer with :Magit, let’s start by binding this command.
" Open vimagit pane
nnoremap <leader>gs :Magit<CR>       " git status
Vimagit’s buffers has modes which will quickly become familiar to most Vim-users.
You can browse through chunks with <C-n> and <C-n, stage the current chunk with S, and enter commit mode with CC, alternatively CA for making an amending commit.
Once you have written your commit message in commit mode, “write” the buffer with your preferred save command and you’re done!
One of my favorite features is the E binding, which will open the modified/staged chunk in your other pane.
Here it is in action:
Git status and commit with vimagit.
Here we have another benefit of tightly integrating git into vim: no more git status or git diff followed by painstakingly opening your text editor and navigating to the file(s) of interest in the CLI output.
There are a whole lot of additional bindings which I wont go into detail here, but all of theme are easily available in the git buffer by pressing ?.
If you want to quickly check out the available functionality without having to install the plugin, you can also click the following header which summarizes all the bindings (source: vimagit’s documentation).
What you may have noticed, is that git push support is missing (it is in the pipeline), but we can easily fix this with a custom binding:
" Push to remote
nnoremap <leader>gP :! git push<CR>  " git Push
Once you have gotten used to vimagit’s interface and wont accidentally trigger bindings anymore, I recommend configuring vimagit such that it allows you to delete untracked files directly from the git buffer:
" Enable deletion of untracked files in Magit
let g:magit_discard_untracked_do_delete=1
tpope/vim-fugitive
Lastly we have the vim-fugitive plugin written by the prolific Tim Pope.
This plugin offers a lot of functionality that has already been offered by the two previous plugins, so I will focus on the unique features which I use.
Start by installing vim-fugitive and the GitHub extension vim-rhubarb:
Plug 'tpope/vim-fugitive'
Plug 'tpope/vim-rhubarb'
Vim-fugitive allows you to git blame your current buffer without leaving vim.
You can then take a closer look at the commit of interest if you want to.
Let’s bind this command:
" Show commits for every source line
nnoremap <Leader>gb :Gblame<CR>  " git blame
In practice it looks like this:
Git blame and diff with vim-fugitive.
Vim-rhubarb allows you to open the current line(s) as visually selected lines on GitHub:
" Open current line in the browser
nnoremap <Leader>gb :.Gbrowse<CR>

" Open visual selection in the browser
vnoremap <Leader>gb :Gbrowse<CR>
This is great for quickly referencing some version controlled lines to your colleagues. We can also bind a command for staging the entire file like so:
" Add the entire file to the staging area
nnoremap <Leader>gaf :Gw<CR>      " git add file
I still recommend not using this binding though, since inline partial staging is a great QA measure as mentioned before. You can read the complete documentation for vim-fugitive here if you are interested.
Conclusion
I hope that I have convinced some of you that there are certain intrinsic benefits of integrating git into your editor-of-choice, no matter how familiar you may be with git’s command line interface from before. Thanks for reading!